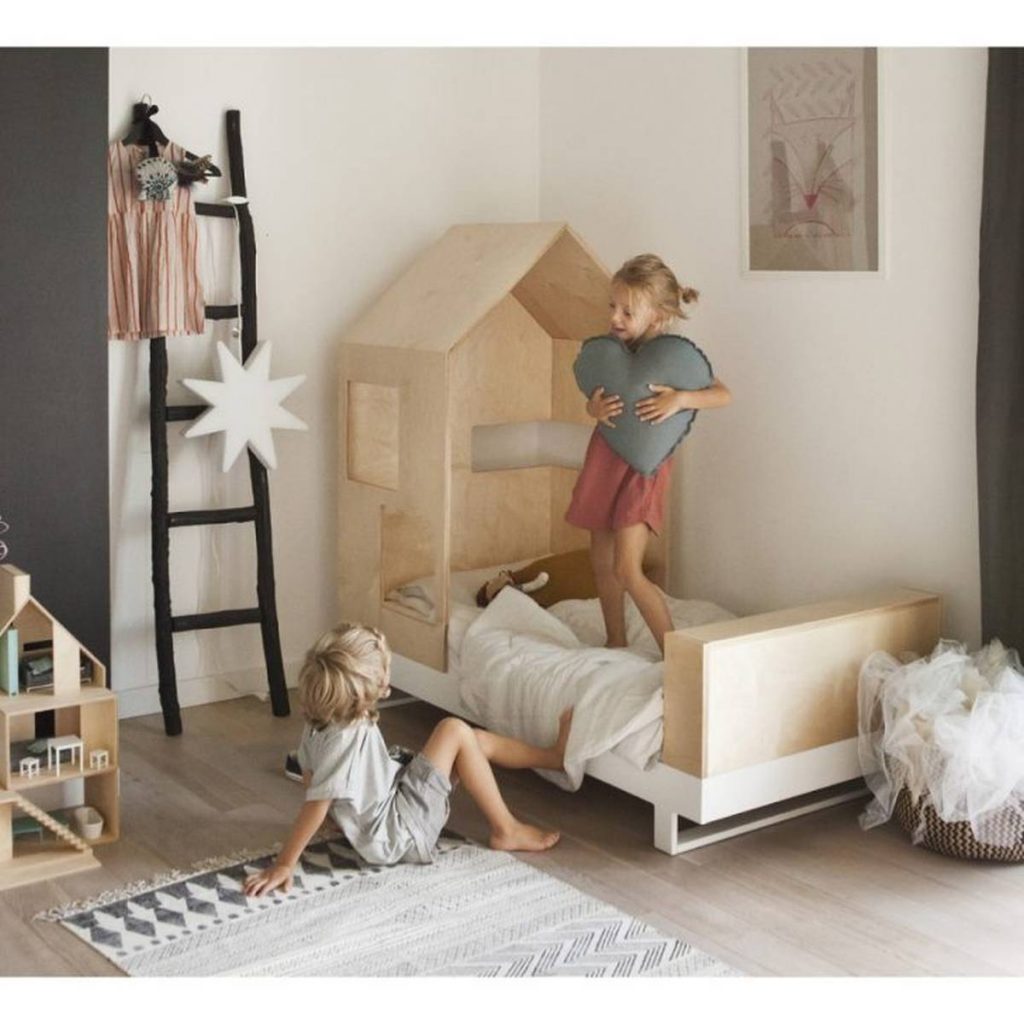
All of us have a story of a time when we were little and we fell out of bed, usually when we were sleeping. Though these tales often provide a good chuckle, they often have a tragic conclusion.
It's possible that some people will suffer head injuries from falling asleep and hitting their heads on the nightstand or another hard surface. Some people might acquire minor scrapes and bruises. One constant, though, is the frightening effect on the parents.
These guardians would most likely look for answers online. The next thing they'll see is a recommendation for a bed rail. However, the price tag puts me off. Therefore, it is recommended that you learn how to construct a toddler bed rail by yourself.
The less difficult option is to just purchase a bed rail. Instead of putting together a baby shower, why not visit one of your favourite baby stores? We give you a few examples of why:
- Costs are reduced. The vast majority of do-it-yourself jobs can save you money compared to buying the same thing in a store.
- It benefits the environment. Do-it-yourself tasks can be completed with success using just materials already on hand, such as those found in homes or garages. A crib rail that has seen better days can be repurposed as a bed rail.
- Your child's preferences can be followed. It can be challenging to locate something you truly love among mass-produced goods. Your kid will probably complain that it's not blue enough, or high enough, or chilly enough. Making a toddler bed rail allows you to consult your child on the matter.
- It's satisfying. It'll get your mind working, but it'll also be rewarding to watch your efforts pay off. Your efforts are what ultimately ensure your child's safety while you sleep.
It's no surprise that parents around the world have come up with numerous ideas to keep their children from slipping out of bed. Here are some suggestions for constructing a guard rail for a child's bed:
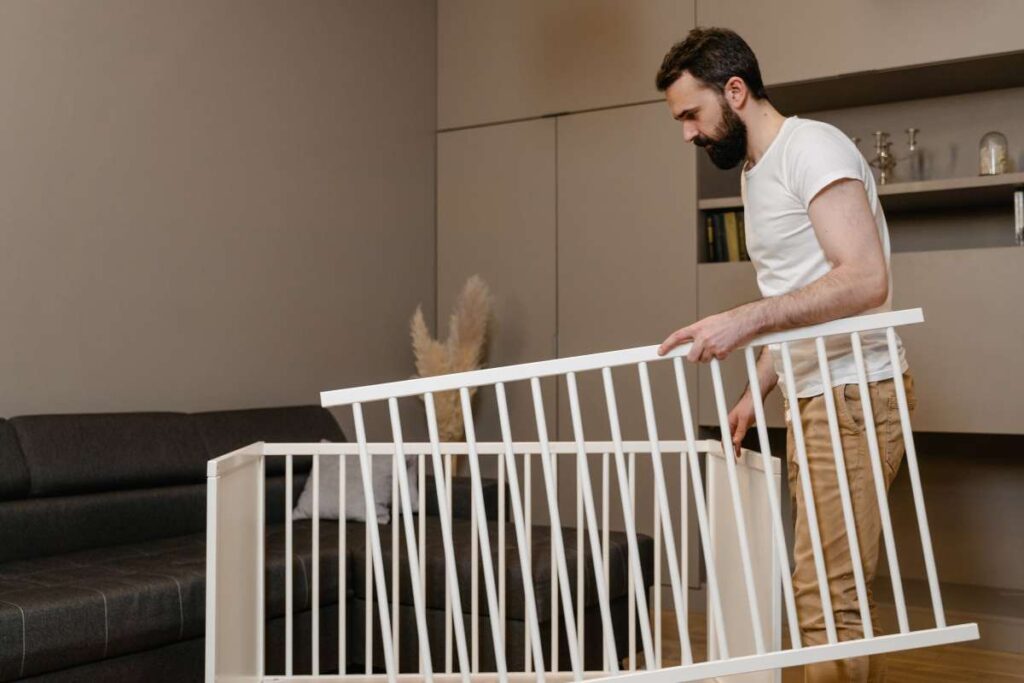
- Upcycling an antique baby crib. Rails for a toddler bed are quite similar in design to those of a baby crib.
- Building with boards of wood. Wooden boards can be found in basements or garages, or purchased from local hardware stores.
- Concealing pool noodles. These can be used as makeshift bumpers by being tucked under the blankets.
- Use of a bolster pillow. These can be tucked under the mattress just like pool noodles.
FAQs About Bed Rail
Alternatives include: roll guards, foam bumpers, lowering the bed and using concave mattresses that can help reduce rolling off the bed. Bedside rails should not be used as a substitute for proper monitoring, especially for people at high risk for entrapment and falls.
Trapeze bars are designed to hang over a bed so a patient can grab and move. Hospital Bed Trapeze bars are especially useful for those who need consistent bed care, who may be physically disabled or in a state where they cannot move their lower extremities.
Hardwood, such as poplar or oak, is a good sturdy wood that works well for building beds. The type of wood used for the side rails should match the bed's headboard and footboard. Recommended thickness for the side rails is 2 inches.
The side rails (which some people refer to as bed rails) should be 2-3 inches longer than the mattress. This gives some extra space when making the bed, but not too much space for things to fall through. We cut our side rails and the 2×3 support board to 76.5″ long.
The CPSC recently revised the standards for the rails' design so that most new bed rails won't pull away from the mattress and create a dangerous gap. Safe strategy: Wait until your child is at least two and can climb in and out of bed before using these.
Upcycling A Crib To Make A Toddler Bed Rail

Focusing on the first two items on the list is appropriate because everyone knows to tuck pool noodles and bolster pillows under the covers. How to convert a baby crib into a toddler bed rail is detailed below.
- Get some screws and a drill ready. Take apart the crib's side rail. Cleanly disassemble the crib's rails from the crib's frame. Maybe there's a way to dismantle the crib's side rails without having to resort to brute force. Some of the methods used to put them together include L-brackets and hinges.
- Make a note of the exact dimensions you need. Cribs for infants typically have high side bars that allow the parent to leave the child unattended. Therefore, in terms of convenience, it is preferable to remove a section of the rails. Toddler bed rails should be cut at a height that is comfortable for the child before you begin.
- Cut to fit your measurements. Leave a mark on the rails at the designated measurement, then trim to fit. You are free to use a handsaw.
- Fasten down a section of the heavy wood plank. A thick piece of wood can be purchased or sourced from the environment. In either case, it will run in a plane that is parallel to or perpendicular to the balusters.
- Determine the spacing between the balusters. While manually installing a new horizontal rail, it's important to account for the distance between balusters when measuring where to place screw holes.
- Drill the holes. To make holes in the wooden board, simply make marks on it first.
- Use screws to fasten the wood to the wall. Always keep in mind that the plank is the rail's opposite end. Put a good screw in it.
- Do some finishes. In order to prevent splinters and other injuries, you may choose to sand the rail using a fine grit paper. The rail can be painted to match the bed's frame.
- The L-brackets can then be attached by screwing them in place. L-brackets should be fastened to the rail's centre and both ends.
- Put the new rail in place on the bed. You can attach the rail to the bed frame with the L-brackets and a few screws.
Constructing A Baby Bed Rail From Scratch
Using a pre-existing crib's rails to construct a bed for a toddler is a simpler option than what comes As you'll be working exclusively with wood planks, higher levels of workmanship are required. As a result, you won't have any kind of artificial sway. Here's how to construct a safety rail for a child's bed out of wood slats:
- Get the necessary gear ready. Be careful to stock up on adequate timber to meet your needs. Obtain a saw, a drill, as well as some wood glue if you can. You'll also need a steel tape measure, a triangle, and some other measurement tools.
- Modify the length of the wooden boards to suit your needs. Modify the size of the wooden boards to suit your needs. You can also round off the corners if you choose.
- Calculate how much room there is between the homemade balusters. Check that the distance between the balusters is suitable for your needs. The gap shouldn't be big enough for the child to slip through.
- Make some holes in the wood planks. Since they look like a regular rail, you can probably guess how you'd use them once you saw them. The wood will need to have holes drilled into it for the screws to go through. Balusters and rails will be installed at both ends as a result.
- Put some glue and screws in the wood. Started fastening the wooden planks together will ensure the stability of the structure. When possible, apply wood glue to the smooth areas as well. Use the triangle to ensure that the balusters and rails are at right angles to one another.
- Do some finishes. In order to prevent splinters and other injuries, you may choose to sand the rail using a fine grit paper. The rail can be painted to match the bed's frame.
- The L-brackets can then be attached by screwing them in place. L-brackets should be fastened to the rail's centre and either end.
- Put the new rail in place on the bed. Mount the rail to the bedposts by screwing the L-brackets and anchoring plates into place.
Two rails can be made instead, if desired. Hook them up to some L-brackets. As so, the rails should form an L. After that, you can place a rail under your mattress and fasten it to your bed frame with screws.
How To Construct Toddler Bed Rails -15 Plans For Diy Toddler Bed Rails

Are your children tossing and turning in bed? The answer is a set of safety rails for the bed. Beds typically do not have guard rails despite the fact that they are standard in baby cribs. But spare no expense when it comes to beds without rails. All of it is only a passing fancy anyway. Children mature quickly, so you may not require their services after all.
Here, we'll discuss the topic of making your own bed rails for toddlers. They keep your youngster safe and sound and prevent them from falling off the chair. You can make bed rails yourself and connect them to the bed your youngster already has rather than replacing it with a new bed specifically designed with bed rails.
All of this can be accomplished in a few hours or less, depending on the details of the design you choose.
Noodles In The Pool As Bumpers!
Allow them to begin with the most basic options. You may make a makeshift triangle under your bed by duct taping three pool noodles together. Simple, yet brilliant. With proper installation, this noodle bumper will keep your child from rolling off the bed.
Some kids are just chronic tossers, and no amount of pool noodles can help them sleep. If your child falls into that category, he or she can benefit from this easy fix. In that case, you might want to check out the alternative DIY project and see if there's a more practical solution there.
Pipes For Bad Rails
Another straightforward do-it-yourself job that doesn't call for a hammer and saw, this one is. You may quickly get started on your project by cutting some PVC pipes to size, purchasing some PVC tees and 90-degree PVC elbows, and sketching out your plan.
This DIY project's design may not be as attractive as the others on this page, but it's inexpensive and simple to construct. If you want to add screws for extra support, you'll need to drill holes in the wood. Aside from that, you won't find a more straightforward or speedy answer for your children's sleeping arrangements.
Rails For Pipe With Textile
Bed rails made of pipe and textile are a variation on the theme of the preceding illustration. With this layout, your baby is less likely to bump into hard surfaces and injure his or her tender skin. In any case, bigger kids might easily tear it to pieces and end up on the floor.
Your Old Crib's Sides Are Your New Bed Rails.
You can't imagine a better upcycling job than the ones this guy makes. A second antique crib is unnecessary if you already have one. Exactly what you've been looking for, right here. In this manner, you may even do your bed rails for nothing (well, maybe a few screws, but let's not get carried away).
Make The Whole By Buying The Parts.
For the layout, nothing is preexisting. It's ideal for those who want to put their own spin on things, tailor it to their exact measurements, or use complementary materials.
You purchase appropriately sized wooden planks, schedule some downtime, and then screw everything into place. You can definitely do it, and this lesson is straightforward and easy to comprehend, but it may take some time. This is the most ingenious, practical, and efficient method of installing bed rails.
All-Wood, Simple Rail
DIYers won't even need screws for this easy job. You'll need just one board, two sides, four smaller planks or sticks (five if you don't cut one in half like in the video), a few dowel sticks, and glue for a more secure hold. We're done here. Make the openings, glue the dowels in place, and let the whole thing dry.
As Easy As It Gets
There is no easier project than this one. A new or repurposed board, brackets cut to the correct width for your bed's side, and some furniture pads to protect the frame's finish are all you need to make this happen. Nice detachable bed rails may be yours in about 15 minutes.
Colour And Textured Rails
This tutorial is not very different from others; the only noticeable change is that the rail in question is a more attractive colour scheme for the room. One long horizontal plank, two shorter ones attached vertically (make sure they fit between the bed frame and the mattress), and the thing that causes all the commotion: wrapping the horizontal plank in a nice-looking textile of your choice (or, should we say, your children's choice), and possibly adding a little bit of sponge inside. Your child's favourite fictional figure now decorates the soft bed rails of its bedroom.
Easy Explanation Of A Complex Project
All those "jacks of all trades" out there, this one's for you. This guy creates an in-depth video tutorial on doing your nails from scratch. When you start from scratch, you can use any approach that yields results.
The tutorial's strong suit is that it demystifies the process by walking you through it from two distinct perspectives and providing you with some useful shortcuts to implement in your own builds.
Make It Outstanding
Many designs call for the rails to be attached to the bed frame, but you may also make them freestanding by attaching the necessary elements under the mattress. The steps are laid out in detail here.
Measure everything out as directed, and get started putting the pieces together. Inexperienced builders will find this task challenging, but with diligence, they can do it.
Across The Entire Width Of The Bed
If your bed is not against a wall, you will need to create two rails since almost all of the projects indicated above are for a single rail. This layout can also be used if you choose.
Here, the 2 rails are screwed together, and the mattress is supported by horizontal planks. That way, you won't have to worry about damaging the frame with glue or screws, and you may have what must be the safest bed rails ever made.
Something That Does Not Require Screws
Sometimes the simplest solution is the one that works best. In any case, feathers were used in the construction of this item.
Simply arrange a number of pillows (either Bolster pillows or regular pillows connected with safety pins or rolled up in some material to keep them together) under the sheet.
A Rail Is Attached To The Bed's Bottom.
These rails are composed of just three horizontal boards, two vertical boards, and two L-brackets. Once you're done, attach the L-brackets to the underside of the bed by screwing the open end to the floor.
Pipes Attached To The Bed's Bottom
Two of everything is used to construct these rails out of PVC pipes, just like the last do-it-yourself design: larger pipes, shorter pipes, tee joints, elbows, and L-brackets. Attach them securely to the bed's base using glue or screws.
Bed On The Floor With Rails
Instead of purchasing a bed and then having a professional install bed rails, why not do both on your own? An entire bed is the reward for sticking with this slightly more involved endeavour. Construct the framework by laying horizontal boards as a foundation, installing the plywood for the mattress, and finishing off the sides with fence-like constructions.
They'll serve as the bed's side railings if they're a certain height, and as bed sides otherwise. While this may appear complicated at first glance, be assured that the included training is straightforward and informative. Your work will be well rewarded, as your child will like its new bed.
Conclusion
Some persons may sustain head injuries if they fall asleep while standing up and bump their heads on a hard surface, such as a nightstand. Reusing a worn-out crib rail into a bed rail is a great way to save money. Home and garage supplies are sufficient for accomplishing DIY projects. Below you will find information on how to install a toddler bed rail on a baby crib properly. L-brackets and hinges are two of the most common attachment mechanisms.
Sand the rail with fine-grit paper to remove any rough spots and reduce the risk of splinters. You can paint the rail to match the bed's wood if you want.
Though they are standard on infant cribs, guard rails are not commonly found in adult beds. They ensure your child is secure in their seat and cannot accidentally get up. Bed rails can be easily fashioned at home and attached to the mattress support of your child's bed. It's so simple that screws aren't even necessary. In only fifteen minutes, you might be sleeping safer with the help of a set of elegant, removable bed rails.
The only visible difference between this instruction and others is the rail, which now features a more aesthetically pleasing colour scheme. Since most of the projects mentioned above are for a single rail, you will need to make two rails if your bed is not against a wall. This job is difficult for inexperienced builders, but they can succeed if they work hard. Here, you'll find the instructions. First, put several pillows under the sheet and secure the bunch with safety pins or a fabric roll.
By doing so, you can avoid using glue or screws, which could potentially ruin the frame. Three horizontal planks, two vertical boards, and two L-brackets make up these bed railings.
Content Summary
- Therefore, it is recommended that you learn how to construct a toddler bed rail by yourself.
- Most do-it-yourself jobs can save money compared to buying the same thing in a store.
- Making a toddler bed rail allows you to consult your child.
- Here are some suggestions for constructing a guard rail for a child's bed: Upcycling an antique baby crib.
- Detailed below is how to convert a baby crib into a toddler bed rail.
- Take apart the crib's side rail.
- Cleanly disassemble the crib's rails from the crib's frame.
- Put the new rail in place on the bed.
- Mount the rail to the bedposts by screwing the L-brackets and anchoring plates into place.
- Hook them up to some L-brackets.
- The answer is a set of safety rails for the bed.
- Here, we'll discuss making your bed rails for toddlers.
- If you want to add screws for extra support, you'll need to drill holes in the wood.
- Bed rails made of pipe and textiles are a variation of the theme of the preceding illustration.
- For the layout, nothing is pre-existing.
- This is the most ingenious, practical, and efficient method of installing bed rails.
- One long horizontal plank, two shorter ones attached vertically (make sure they fit between the bed frame and the mattress), and the thing that causes all the commotion: wrapping the horizontal plank in a nice-looking textile of your choice (or, should we say, your children's choice), and possibly adding a little bit of sponge inside.
- This guy creates an in-depth video tutorial on doing your nails from scratch.
- Many designs call for the rails to be attached to the bed frame, but you may also make them freestanding by attaching the necessary elements under the mattress.
- Measure everything out as directed, and get started putting the pieces together.
- If your bed is not against a wall, you will need to create two rails since almost all of the projects above are for a single rail.
- The two rails are screwed together, and horizontal planks support the mattress.
- These rails are composed of just three horizontal boards, two vertical boards, and two L-brackets.
- Attach them securely to the bed's base using glue or screws.
- Construct the framework by laying horizontal boards as a foundation, installing the plywood for the mattress, and finishing off the sides with fence-like constructions.
- They'll serve as the bed's side railings if they're a certain height and as bedsides otherwise.