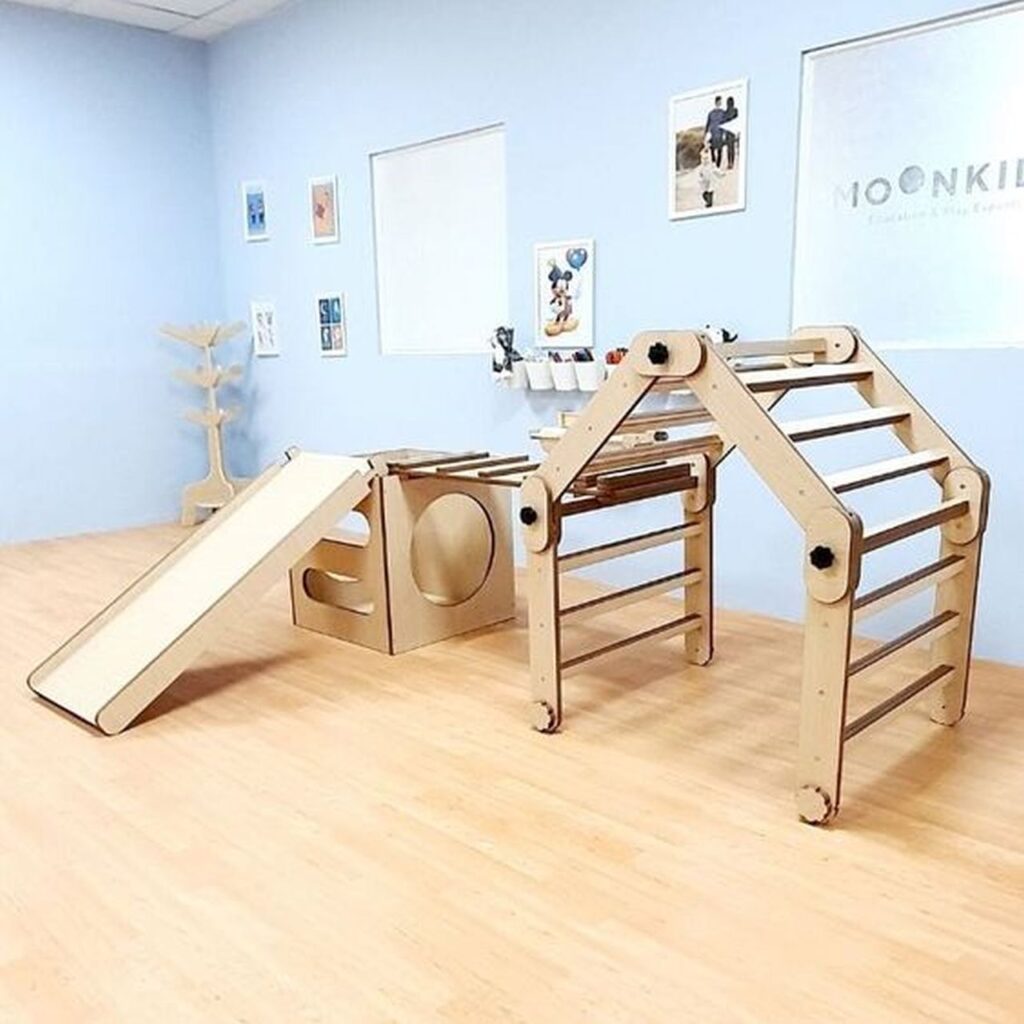
Pikler's Triangle Global health experts recommend climbing frames for infants as young as 6 months to help them grow in strength and coordination at their own pace. The Australian-made climbing frames from Little Big Learning come in a variety of colours and textures because there's no reason why high-quality playground equipment can't also be aesthetically pleasing.
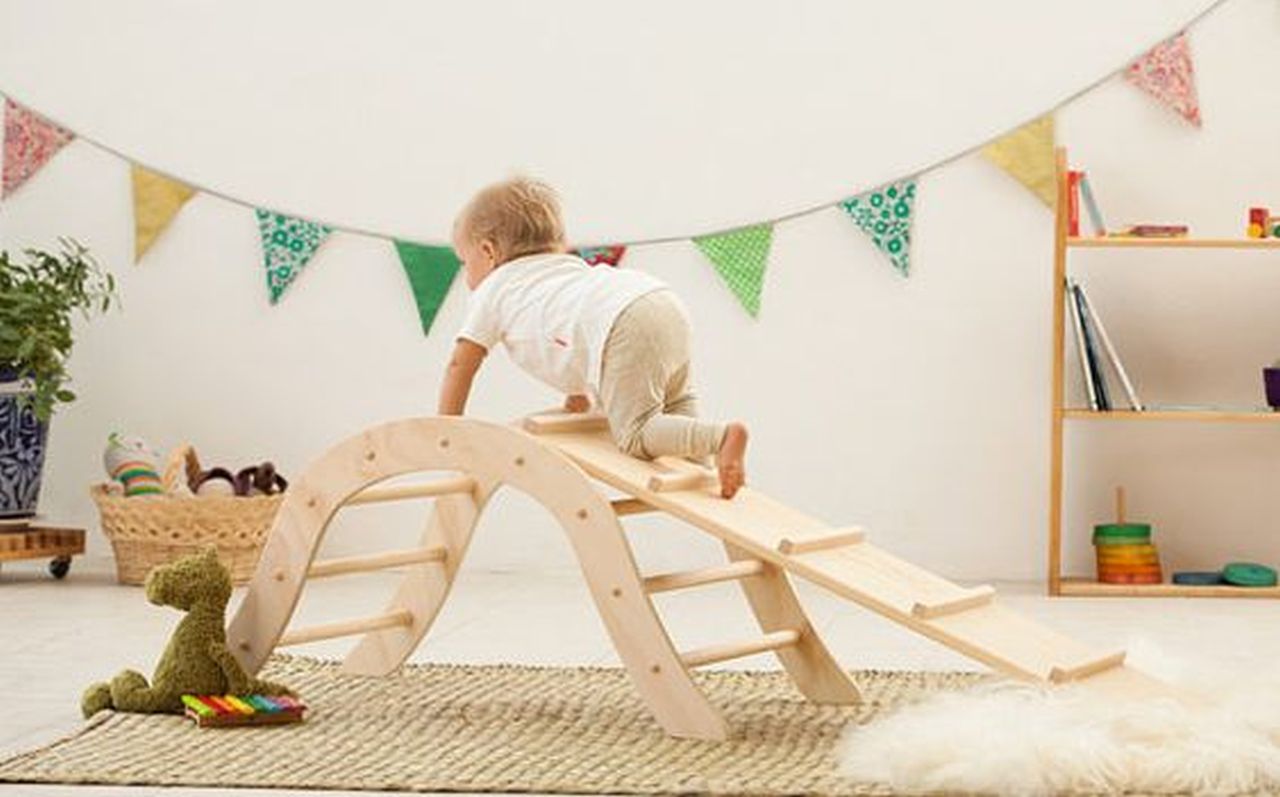
Emmi Pikler, a Hungarian paediatrician and early theorist of child development in the 1930s and 1940s, is the inspiration for the Pikler triangle climbing frame. She felt strongly that kids should be given the chance to develop their physical skills at their own pace.
It is crucial that the child be given as many opportunities as possible to learn on their own. If we do everything for them, the child will never learn to do things on his own, and that will stunt his psychological growth. A child who learns something by pursuing it on his or her own and succeeding does so with a different quality of understanding than one who is simply given the solution. Mr. Emmi Pikler
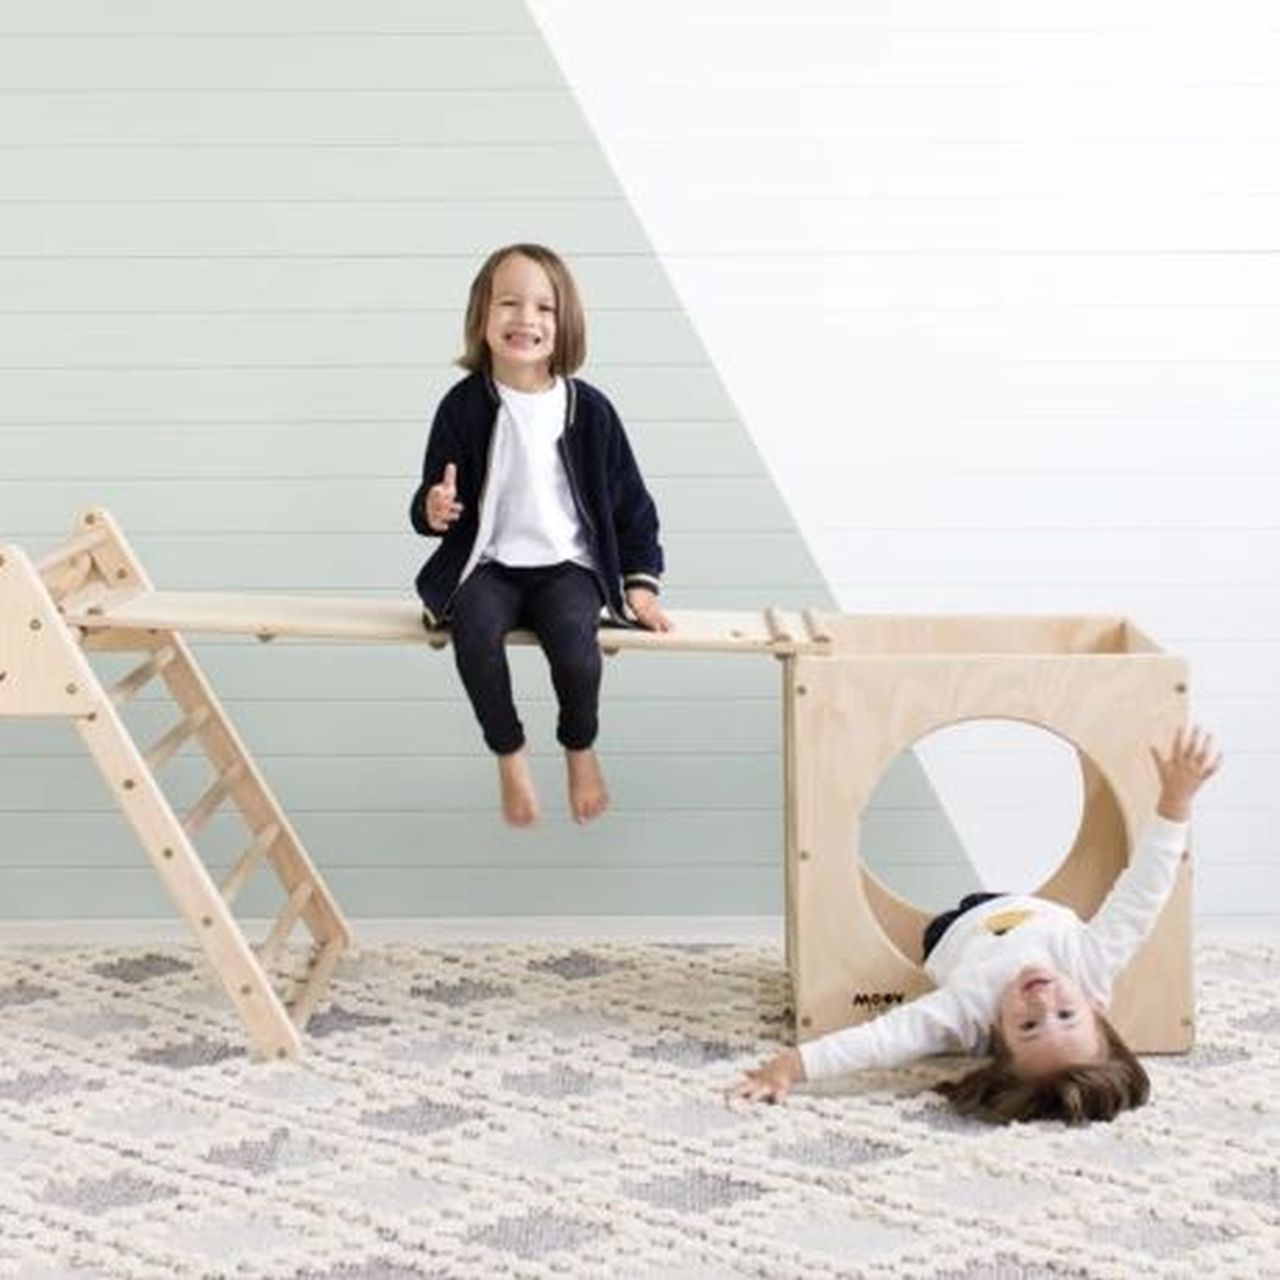
It's a sturdy indoor climbing structure that lets kids (from 6 months to 6 years) work on their gross motor skills and tackle physical challenges at their own pace. When babies first learn to stand, they can use the rungs to help them pull themselves up, and eventually they can teach themselves to climb all the way to the top.
The Pikler is designed to foster children's curiosity and self-confidence in their physical abilities by allowing them to safely experiment with those capabilities on their own, without the supervision of their parents.
Specially designed, one-of-a-kind baby room accessories. Visit this page to view the selection at My Baby Nursery.
FAQs About Baby Nursery
This is how your baby's brain grows. There is a lot of activity happening in their brain during light sleep, and their body often reacts to this stimulation by moving, twitching, making lots of noises and facial expressions including smiles.
As early as three months, babies learn to recognize their parents or primary caregivers. And there staring is their way to communicate. Babies can't quite interact yet for the first few months, so their staring is their way of communicating with you.
That's because between 4 and 7 months babies begin to realize that people and objects exist even when they can't see them. This is called object permanence. For example, if you leave the room your baby will know that you've gone away.
Melatonin is the sleep hormone that helps the body control sleep cycles. Light breaks down melatonin, and consequently, babies will produce lower levels during the day when rooms tend to be brighter. Therefore, napping in a dark room will support this hormone, which in turn helps them fall and stay asleep.
When your baby's only a few weeks old, his memories usually last for up to two days. A research investigation confirmed that by the time he reaches 5 months, he can remember photos of faces for as long as 14 days.
Steps in Making a Foldable Pikler Triangle Climbing Frame
Resources
A trip to the large box store will yield all the materials needed for this project, and the tools required are standard fare for the garage workshop of any woodworker. Affiliate links are included below to help support our station.
USED MATERIALS:
- The Best Hand Drill: https://amzn.to/2Hgz4cG
- Hammer Drill - https://amzn.to/2Fxtr7w Impact Driver -
- Tools for holding things together: https://amzn.to/2Hq1GjS
- optional chisels https://amzn.to/2En3WoS
- Cutter saw (https://amzn.to/2CHEFWd)
- Optional: Tablesaw (https://amzn.to/2TaegKQ)
- An optional desktop belt sander can be found at this link: https://amzn.to/2CEji8g.
- https://amzn.to/2CIFLkF Sandpaper
- Measuring Tape: https://amzn.to/2C00Jv7
- This is the Block Plane, and you can get it here: https://amzn.to/2FwR5Rl.
MATERIALS:
- 3/4-inch Poplar
- Plywood made from birch bark (one half inch thick)
- 3/4-Inch Birch Plywood
- Safety Hardware for Rock Climbing: https://amzn.to/2HLiF0G
- Adhesive for wood, available at: https://amzn.to/2Ts82pT
- For superglue, visit https://amzn.to/2Tt0NOJ.
- Tape for painting walls, blue: https://amzn.to/2tVFsOA
- Washers (8) (8)
- Inserts with Threads (4)
- Screws for Machines (2)
- Set of 2 Plastic Tilt Knobs - https://amzn.to/2U9IApB
- In addition, the strategies
Ladder:
- Legs That Are Only an Inch and a Half Wide
- Leg Thickness: 3/4"
- Sturdy Rings With a 1 Inch Diameter
- 32" Wide
- 36" Long (Long Side) (Long Side)
- 32" Long (Short Side) (Short Side)
- Normal Adult Height: 31.5"
- Decline of 30 Degrees
Ramp:
- 24" Wide
- 48" Long
- T-Nut 6 Inch Grid Pattern
Steps up the Ladder, as it Were!
Step one of this construction project was to cut the individual ladder rungs. These are crafted from Poplar dowels measuring 1 inch in diameter that we purchased from a local hardware store. We needed 13 dowels to construct the ladder because it had two sides, one short and one long.
To make the 30.5" dowels, we purchased ones that were 48" long. The resulting offcut is of an unusual size, but it will serve us well in the long run.
After cutting them to length, we used blue painter's tape to seal off a 6-inch section at each end before painting.
Using any standard saw should do the trick, but if you want them all the same length, a stop-block is useful. When we finally get around to putting it together, this will be a big assistance. For this job, we utilised the table saw, but a jigsaw, hand saw, or circular saw would also do the trick!
Milk Paint for Colors, Please! (OPTIONAL)
The dowels' tips were given a contrasting hue with Milk Paint, which works wonderfully for this purpose. Due to its safety, it is ideal for use in children's craft projects, and it does an excellent job of transforming raw wood into finished objects. Coverage is excellent, there are no brush strokes or streaks, and the colours pop out beautifully.
We used the five colours we had on hand to paint the ends of the dowels and arrange them in a design we liked. Though it's not required, I highly recommend giving it a splash of colour to make it stand out.
TIP Milk paint dries extremely matte and leaves no sheen behind. If you prefer a high-gloss finish, you can apply a shellac coating over it later.
Ladder Supporting Ropes!
Poplar boards 3/4" thick were used to make the ladder's legs. These may be purchased in nearly the precise size you need for this project, and they can be found at most big box retailers.
Ours were shredded on the table saw to a width of 3 inches. Lack a table saw of your own? You can also use a circular saw to rip them, or make minor adjustments to the overall size, so that the boards can be used "as is" when you bring them home.
Each leg had its tip squared off, and then a mason jar lid was utilised to give it a rounded appearance. (Just right!) The next step was to use the jigsaw to remove the circular shape from the tips of all four legs.
To round off the edges, we used a disc sander we acquired at a rummage sale, but sandpaper would work just as well.
One helpful hint for anyone shopping for lumber at a store is to allow themselves a bit more time to peruse the inventory and select the straightest boards possible. Every phase of the process is made more challenging if the boards are bent or broken.
Making Holes for the Staircase Rails!
The initial hole was marked 1 inch from the end, and subsequent holes were spaced at 5 inch intervals across the entire length. This allowed us to drill holes in the ladder at the precise locations we specified. Since there is no need for the very lowest rung to be flush with the floor, it is raised slightly above the ground.
A 1" Forstner bit was used to drill a clean hole to a depth of 1/2" after we marked the location of each hole.
If you want perfectly round holes, Forstner bits are your best bet. We recommend getting a set if you practise any kind of woodworking and don't already have one.
Mounting the Stairs Using Glue!
The holes on one side of the ladders were glued together using standard wood glue. After inserting the ladders to their full depth, we used a mallet to tap them in place.
After they were all in place, we glued the exposed side, turned the ladder over, and tapped it into place from above.
When everything was in position, we clamped everything down and let it overnight to dry. Clamping the pieces together isn't technically necessary because the dowels fit snugly into the holes, but it is recommended to make sure the pieces are brought together.
Advice: The ladder rungs will want to twist a bit at this stage, making it simple to get out of square. Don't rush, and check that everything fits perfectly square. If it begins to twist, make the necessary adjustments as soon as possible so that it is straight when the glue becomes tacky. If the ladder is crooked, putting it together will be a nightmare.
If you're looking for nursery decorations, go no further than our extensive selection. See it for yourself here.
Avert your eyes from the Triangles!
Each side of the long and short ladders have a triangular component that connects them at the top. We used birch plywood that was half an inch thick to make these.
When unfurled, the angle of our Pikler Triangle is 30 degrees, so we used a cardboard template with the leg positions marked off to get everything in the right place.
We pre-drilled pilot holes for two screws on the long side of the ladder to provide a secure connection between the triangle and the ladder.
The short side of the ladder also features two screws; one of these serves as a pivot point, while the other secures a plastic knob that may be used to fold and unfold the ladder with relative ease.
Both of the holes on the Long side are only pilot holes for the permanent screws, whereas the holes on the Small side are drilled using Forstner bits.
To avoid making any mistakes when marking the location of the holes on your template, remember that the two triangles are mirror images of each other and flip it upside down.
Constructing a Ladder, Part One
We were able to begin assembly once the triangles were completed. In terms of fasteners, we're just utilising some standard washers, screws, and two 1/2 "Inserts used to divide the walls of a room; typically made of plastic.
We oriented the ladder so that its longer side rested on one of the triangles, ensuring a straight vertical line between the ladder's top and its side. We fastened it on for the time being, took it off the bench, and drilled pilot holes, referencing the already-existing holes. To finish, we used wood glue and two wood screws to secure it.
TIP: Since Poplar is a hardwood, we made sure to drill pilot holes whenever utilising screws so that we didn't risk splitting the wood. And because the holes are already drilled, you can rest assured that your components will remain in perfect alignment as you put them together.
The Second Half of the Ladder!
We bolted the Ladder's shorter side to the wall and marked the locations of the remaining two holes with a pen. We were able to remove it once again and precisely position two holes for the threaded inserts thanks to this.
Assembly continued with the addition of two washers between the triangle and the leg, creating a slight gap between the plywood that eliminates rotational friction.
The plastic spacer is then pushed into the top hole before a washer and screw are attached. As the ladder folds and unfolds, this serves as the pivot and may be rotated freely.
The adjustable knob and washer are the final components to be installed into the lower hole. When the ladder is folded and unfolded, this is utilised to secure it in place.
Hardwoods like Poplar can make threaded insert installation challenging. To facilitate its insertion, attempt using paste wax on the insert's threads. They could shatter and become a frustratingly intractable problem otherwise.... (If you want to know how, just ask!)
Three Parts to the Assembling of a Ladder!
After the assembly was complete and the bolts were tightened, we used a trim router fitted with a flush trim bit to ensure that the triangle sat exactly level with the legs. Since the triangle's apex is square, we utilised this feature to round the triangle's outer edge, making it conform to the profile of the rounded apexes of the ladder's legs.
Assembling the ladder was complete after that! Then we headed down the ramp...
One helpful hint is to use flush trim router bits. We think they're an essential tool for any woodworker's workshop, so if you don't already have one, now is the time to get one.
Ascending Staircase!
The ramp was constructed using a 3/4 "plywood made from birch trees. We ripped it to the desired width (24 inches) and then marked the board with three lines spaced 6 inches apart along its length.
Afterward, we utilised a measuring device to determine "squared the lines across, giving us a grid pattern for our t-nuts, and then worked our way down from the top. Having a sizable grid pattern allows us to place the climbing holds in a wide variety of configurations due to the T-Nuts being able to securely screw into the holds.
After drilling a 3/8 hole through to the back, the T-Nuts were placed "drill bit used as a starting point for a larger project. Once you get them to that point, one good whack with a hammer is all it takes to drive them in.
T-Nuts should be carefully inserted into their holes to ensure they are straight. Hammering them in slightly crooked makes them difficult to use from the other side, but it's not hard to do.
There's that annoying edge banding again.
Edge-banding is being used to smooth up the plywood's rough edges so that it looks more presentable. Once you have it cut to size, you may clamp this 3/4" birch edge-banding in place and use an ordinary household iron to heat it and stick it down.
We used a block plane to remove the protruding edges. A piece of sandpaper would work, too.
After the edge banding was put completely, we used 220 grit sandpaper to refine the ramp's edges and corners.
Use edge-banding to drastically improve the appearance of plywood furniture without spending a fortune. Moreover, it's a breeze to put to good use.
The Holder-Ramp Thing.
Jaimie used scraps of Poplar to fasten to the climbing ramp's underside, allowing it to rest on the rungs of the ladder and be adjusted as needed. The 1" Poplar dowels slide easily and tightly into the gap between the two halves, allowing for easy assembly and disassembly.
To achieve this, we utilised a square to set two pieces of Poplar at the desired width, which was the same as the ramp. We used pencil lines to designate the spots.
After making pilot holes, we used glue and screws to secure everything.
You may account for the ramp's diagonal placement by following this helpful hint: when we attached them, we relocated them to the _outside_ of the pencil line. This makes it easy to move around but snug when in place.
You've found the grips!
We had a rock climbing wall in the basement (which we had built together!) and still had a bunch of unused holds in the storage closet. (Since not everyone will already have one, we'll show you how to make your own in the next section.)
There is a dizzying array of sizes and varieties of climbing grips to choose from. Slopers, jugs, crimps, ledges, pinches, and so on. Each presents its own unique difficulties to the climber. Variety is the spice of life!
We had a good amount of time joking about with various grip configurations. As our son develops and gains confidence on the ramp, we will be able to try new tricks and set him increasingly difficult challenges.
Climbing grips are quick and simple to instal and remove thanks to the 3/8" hex bolt that serves as the attachment mechanism.
A helpful hint: there are many ways to make or purchase these items on the internet.
Using a piece of scrap wood to fashion a handhold for climbing.
Get a piece of wood that's 3-8 inches long. It needs to be sanded well to remove any sharp edges and prevent splinters.
To replicate the grips we're using, locate the centre of your piece of wood, drill a larger hole for the washer that's deep enough for the screw's head, and then drill a second, smaller hole.
After that, you can secure the washer using super glue. As simple as that! Quick and easy DIY rock climbing grip.
Cutting the wood into different shapes and sizes is a great way to add some visual interest. Therefore, the climber must use a wide variety of grips on the holds, which presents a formidable task.
Also, congratulations; you've just built your kid a rock wall. I couldn't be more pleased with the outcome. The Pikler triangle can be used as-is, or they can attach to the nearby rock face. My brother also created the triangle height-adjustable, so the challenge can increase along with the player's skill. Perhaps they'll come rock climbing with me someday.
Trying to find the right accessories for your baby's room? Browse a wide selection of baby nursery accessories online.
Conclusion
Emmi Pikler, a Hungarian paediatrician and early theorist of child development in the 1930s and 1940s, is the inspiration for the Pikler triangle climbing frame. Global health experts recommend climbing frames for infants as young as 6 months to help them grow in strength and coordination. Poplar boards 3/4 thick were used to make the ladder's legs. Each leg had its tip squared off, and then a mason jar lid was utilised to give it a rounded appearance. We recommend getting a set of table saws if you practise any kind of woodworking.
We used birch plywood and Forstner bits to create our Pikler Triangle Ladders. Long and short ladders have a triangular component that connects them at the top. We pre-drilled pilot holes for two screws on the long side of the ladder. Edge-banding is being used to smooth up plywood's rough edges so that it looks more presentable. Jaimie used scraps of Poplar to fasten to the climbing ramp's underside, allowing it to rest on rungs of the ladder and be adjusted as needed.
Climbing grips are quick and simple to instal and remove thanks to the 3/8 hex bolt that serves as the attachment mechanism. The Pikler triangle can be used as-is, or they can attach to the nearby rock face. There is a dizzying array of sizes and varieties of climbing grips to choose from.
Content Summary
- Pikler's Triangle Global health experts recommend climbing frames for infants as young as 6 months to help them grow in strength and coordination at their own pace.
- Emmi Pikler, a Hungarian paediatrician and early theorist of child development in the 1930s and 1940s, is the inspiration for the Pikler triangle climbing frame.
- It is crucial that the child be given as many opportunities as possible to learn on their own.
- Mr. Emmi PiklerIt's a sturdy indoor climbing structure that lets kids (from 6 months to 6 years) work on their gross motor skills and tackle physical challenges at their own pace.
- The Pikler is designed to foster children's curiosity and self-confidence in their physical abilities by allowing them to safely experiment with those capabilities on their own, without the supervision of their parents.
- Specially designed, one-of-a-kind baby room accessories.
- We needed 13 dowels to construct the ladder because it had two sides, one short and one long.
- After cutting them to length, we used blue painter's tape to seal off a 6-inch section at each end before painting.
- Poplar boards 3/4" thick were used to make the ladder's legs.
- Making Holes for the Staircase Rails!The initial hole was marked 1 inch from the end, and subsequent holes were spaced at 5 inch intervals across the entire length.
- This allowed us to drill holes in the ladder at the precise locations we specified.
- Mounting the Stairs Using Glue!The holes on one side of the ladders were glued together using standard wood glue.
- Clamping the pieces together isn't technically necessary because the dowels fit snugly into the holes, but it is recommended to make sure the pieces are brought together.
- Advice: The ladder rungs will want to twist a bit at this stage, making it simple to get out of square.
- Don't rush, and check that everything fits perfectly square.
- If the ladder is crooked, putting it together will be a nightmare.
- Avert your eyes from the Triangles!Each side of the long and short ladders have a triangular component that connects them at the top.
- When unfurled, the angle of our Pikler Triangle is 30 degrees, so we used a cardboard template with the leg positions marked off to get everything in the right place.
- We pre-drilled pilot holes for two screws on the long side of the ladder to provide a secure connection between the triangle and the ladder.
- To avoid making any mistakes when marking the location of the holes on your template, remember that the two triangles are mirror images of each other and flip it upside down.
- Constructing a Ladder, Part OneWe were able to begin assembly once the triangles were completed.
- We oriented the ladder so that its longer side rested on one of the triangles, ensuring a straight vertical line between the ladder's top and its side.
- The Second Half of the Ladder!We bolted the Ladder's shorter side to the wall and marked the locations of the remaining two holes with a pen.
- We were able to remove it once again and precisely position two holes for the threaded inserts thanks to this.
- Assembly continued with the addition of two washers between the triangle and the leg, creating a slight gap between the plywood that eliminates rotational friction.
- The adjustable knob and washer are the final components to be installed into the lower hole.
- Since the triangle's apex is square, we utilised this feature to round the triangle's outer edge, making it conform to the profile of the rounded apexes of the ladder's legs.
- Assembling the ladder was complete after that!
- Then we headed down the ramp...One helpful hint is to use flush trim router bits.
- The ramp was constructed using a 3/4 "plywood made from birch trees.
- Having a sizable grid pattern allows us to place the climbing holds in a wide variety of configurations due to the T-Nuts being able to securely screw into the holds.
- Edge-banding is being used to smooth up the plywood's rough edges so that it looks more presentable.
- After the edge banding was put completely, we used 220 grit sandpaper to refine the ramp's edges and corners.
- Use edge-banding to drastically improve the appearance of plywood furniture without spending a fortune.
- Jaimie used scraps of Poplar to fasten to the climbing ramp's underside, allowing it to rest on the rungs of the ladder and be adjusted as needed.
- You may account for the ramp's diagonal placement by following this helpful hint: when we attached them, we relocated them to the _outside_ of the pencil line.
- You've found the grips!We had a rock climbing wall in the basement (which we had built together!)
- and still had a bunch of unused holds in the storage closet. (
- Since not everyone will already have one, we'll show you how to make your own in the next section.)There is a dizzying array of sizes and varieties of climbing grips to choose from.
- Using a piece of scrap wood to fashion a handhold for climbing.
- Quick and easy DIY rock climbing grip.
- Therefore, the climber must use a wide variety of grips on the holds, which presents a formidable task.